

In the last post regarding OpenAI Agent Builder, I showed you how you can easily build a booking agent. You can check it out here: Create Agent Using OpenAI AgentBuilder
And in this post, I’ll show you how to put the shiny new agent that you created inside OpenAI’s Agent Builder, on your website.
I’ve been working with AI tools long enough to know that it feels magical building them, but it’s in deploying them where real humans can use them, break them, and force you to fix the things you thought were perfect.


So in this post, I’ll walk you through exactly how I got my Agent Builder–powered booking bot out of the playground and embedded into a real website. I’ll share the process, the practical steps, the mistakes, and the unexpected “oh, so that’s how this works” insights I learned the hard way.
This isn’t a surface-level tutorial. It’s the guide I wish someone had handed me on day one.
Why Embedding Isn’t Optional (Even If You’re Just Testing)
OpenAI’s Agent Builder is an absolute joy to use. Drag-and-drop workflows, tool connectors, custom logic, it feels like running a command center for your own assistant. That’s great, but there’s a problem:
If your agent never leaves Agent Builder, it’s not an agent. It’s a pet project.
Real users behave differently.
Real data is messy.
Real contexts break assumptions.
Embedding lets you actually test this. It gives your agent a home, on your website, where people interact with it naturally. That’s where you discover if your brilliant workflow is actually brilliant… or just brilliant in your head.
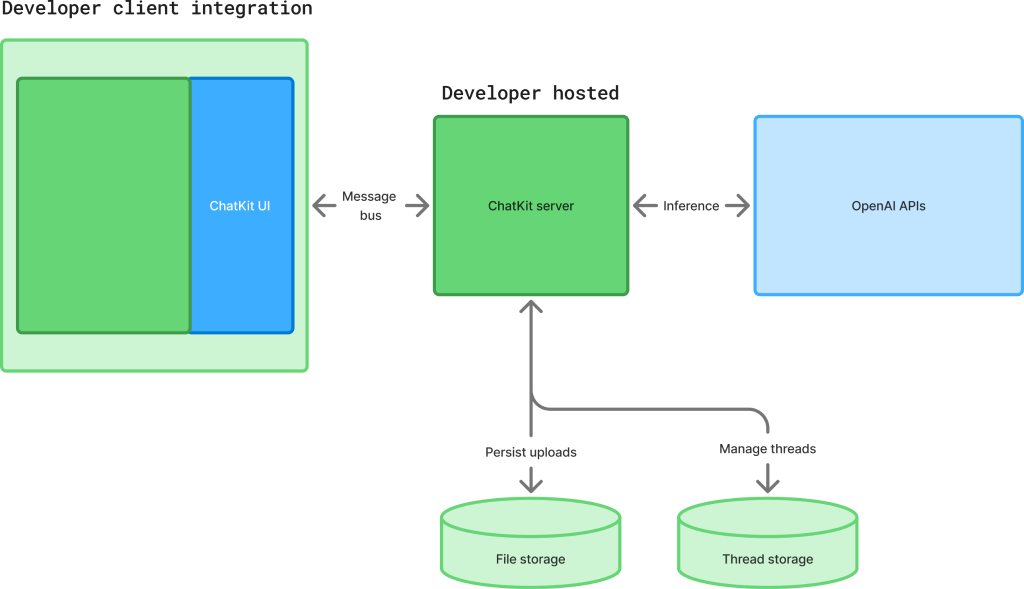
The Tech Stack Used: Agent Builder + AgentKit + ChatKit
To deploy your agent publicly, you end up using a trio of tools OpenAI created:
1. Agent Builder
Visual workflows, connectors, logic branches, state management – all built without writing 1000 lines of code.
2. AgentKit
The backend side of things. It unifies tools, workflows, and deployment, and handles the integration logic under the hood.
Note: AgentKit wasn’t used directly in the embedding steps – it runs automatically underneath the agent I deployed. Publishing a workflow in OpenAI automatically packages your nodes, logic, and tools using AgentKit’s underlying runtime.
3. ChatKit
This is the star for embedding.
It’s the embeddable chat interface (think of it as your agent’s “front door”) that you put on your website.
Individually, each tool is great. Together, they form a surprisingly powerful deployment pipeline, once you understand how to connect the dots.
The Step-by-Step Guide: How I Embedded My Booking Agent
Here’s the exact roadmap I took. Follow it honestly and you’ll go from idea → live agent in a few hours.

1. Build Your Agent in Agent Builder (Then Break It Yourself)
I started exactly where you probably did:
- I created a booking flow.
- I defined a few nodes to parse the user’s date and time.
- I added confirmations, fallbacks, and some state to store booking info.
Then I tested it. Repeatedly. Aggressively.
If you aren’t breaking your own agent, people will. Just like they break all other perfect things 🥲
Agent Builder’s debugger is genuinely underrated, being able to inspect step-by-step state transitions is priceless.
2. Publish the Agent & Get the Workflow ID
Once my booking logic wasn’t embarrassing anymore, I hit Publish.
Publishing gives you two things:
- A Workflow ID — you’ll need this for ChatKit.
- A way to whitelist the domains your agent is allowed to talk to.
Do not skip the domain step.
If you skip it, nothing will work and you will question your life choices, and I don’t want you to do that. I want the best for you🫂
3. Fork the ChatKit Sample App
OpenAI provides a ChatKit starter app. It’s the easiest way to get a proper, embeddable UI without building a frontend from scratch.
Here’s what I did:
- Forked the sample repository from GitHub.
- Connected it to my own OpenAI project.
- Added environment variables:
OPENAI_API_KEY=your-key-here
NEXT_PUBLIC_CHATKIT_WORKFLOW_ID=your-agent-workflow-id
Pro tip:
Your API key must come from the same project where the agent lives. Otherwise your agent pretends it doesn’t know you.
4. Deploy the ChatKit Frontend (I Used Vercel)
You can deploy anywhere, but Vercel made it almost comically easy:
- Link GitHub repo
- Add environment variables
- Click Deploy
In 60 seconds I had a public URL.
This URL is what your website will embed.
5. Add Your Domain in OpenAI
This is the part everyone forgets. Inside OpenAI:
- Add your frontend domain (e.g., https://booking.yourdomain.com)
- Save
- Regenerate your ChatKit config if needed
This ensures only your site can talk to your agent.
It’s required for security.
6. Embed the Chat UI Into Your Website
Here comes the fun part. YAAYYYYYYYYYYY
You can embed your ChatKit app using a simple iframe:
<iframe
  src="https://your-vercel-app-url.vercel.app"
  style="width: 420px; height: 640px; border: none; border-radius: 12px;">
</iframe>
That’s it.
Your OpenAI Agent Builder booking bot now lives on your website.
If you want a more integrated experience, you can use the ChatKit JS SDK in your own React site. But the iframe is perfect for MVPs.
7. Test in Production (Users Are Ruthless)
Once live, I ran a dozen real booking flows:
- wrong date formats
- multiple dates in one sentence
- ambiguous requests
- “book ASAP”
- “book for tomorrow morning but not too early”
Every mistake became a workflow improvement. This is why embedding is essential.
8. Monitor, Tune, and Iterate
Agent Builder + AgentKit provide:
- full traces
- conversation logs
- node-level execution history
- error stacks
This telemetry is your mentor. Pay attention. My first booking agent was naive. After real user testing, I added:
- handling for vague times
- automatic validation
- fallback clarification nodes
- user sentiment detection (for fun)
The agent grew because the logs told me what to fix.
Common Gotchas – What No One Warned Me About (But You Should Know)
1. Documentation is still catching up
Agent Builder + ChatKit are new.
Some features work perfectly; others feel experimental. Don’t expect hand-holding.
2. You must configure domains correctly
If you don’t, ChatKit refuses to talk to your workflow.
3. If you use external calendars or booking systems, expect complexity
These require MCP connectors or custom APIs. Totally doable – just not plug-and-play.
4. It’s powerful, but not “production-grade enterprise” yet
This is fantastic for:
- startups
- MVPs
- prototypes
- tools
- internal dashboards
- early customer-facing features
But for mission-critical systems? Be cautious, test extensively, and use guardrails.
Lessons I Learned That You’ll Want to Know
1. Start embarrassingly simple
You can always add intelligence later. The first job of your agent is to not get confused.
2. Vercel saves hours
The ChatKit workflow → deploy → embed cycle becomes frictionless.
3. Make your agent over-communicate
Humans give messy booking instructions. Your agent should confirm everything.
4. Logs are worth their weight in gold
Every surprising user message is a workflow upgrade in disguise.
5. Don’t wait for perfect documentation
These tools reward experimentation. You learn by trying, breaking, and fixing.


Final Thoughts: You Can Deploy Your Agent Today
If you built something cool in OpenAI’s Agent Builder, you don’t need to leave it in the playground. You don’t need to wait for official widgets, complex SDKs, or someone’s YouTube tutorial to drop.
You can embed it today.
The Agent Builder → AgentKit → ChatKit pipeline is real, usable, and surprisingly powerful once you understand how to connect the pieces.
And the best part?
The moment your booking agent sits on your website and handles its first real user query…
it stops being an experiment and starts being a product.