
Ever been super excited to dive into a new TensorFlow project, only to be slammed with the frustrating error: “Could not find a version that satisfies the requirement TensorFlow”? I know I have, and it’s incredibly annoying! It feels like you’re hitting a brick wall before you even get started. But don’t worry, it’s a common problem, and the fix is usually pretty straightforward.
In this post, I’ll walk you through the most likely cause of this error and show you exactly how to resolve it. Trust me, you’ll be installing TensorFlow and building amazing things in no time.
If you are a visual learner, check out video guide below:
The Root Cause: Python Version Incompatibility
The most frequent culprit behind this error is an incompatibility between your Python version and the TensorFlow version you’re trying to install. TensorFlow, like any software library, has dependencies on specific Python versions. If you’re using a Python version that TensorFlow doesn’t support, pip (the package installer for Python) won’t be able to find a compatible version to install.
For example, if you’re rocking the latest and greatest Python 3.14 (as of writing), you might run into this issue. Why? Because TensorFlow might not have caught up yet!
Let’s take a look at the supported Python versions for TensorFlow. As of now, TensorFlow officially supports Python versions 3.9 through 3.12. However, from my personal experience, Python 3.13 often works without any issues. So, aiming for Python 3.13 might be a good middle ground.
To confirm you’re encountering this issue, you can quickly check your Python version by opening your command prompt or terminal and typing:
python --versionIf your Python version is outside the supported range (3.9-3.13), that’s likely your problem. Time to downgrade (or upgrade, depending on the version)!
The Solution: Installing a Compatible Python Version
The solution is simple: install a Python version that TensorFlow actually likes! Here’s how to do it:
Step 1: Download a Compatible Python Version
Head over to the official Python website: python.org. Hover over the “Downloads” section and click on “View full list of downloads”. This will take you to a page where you can browse and download different Python versions.
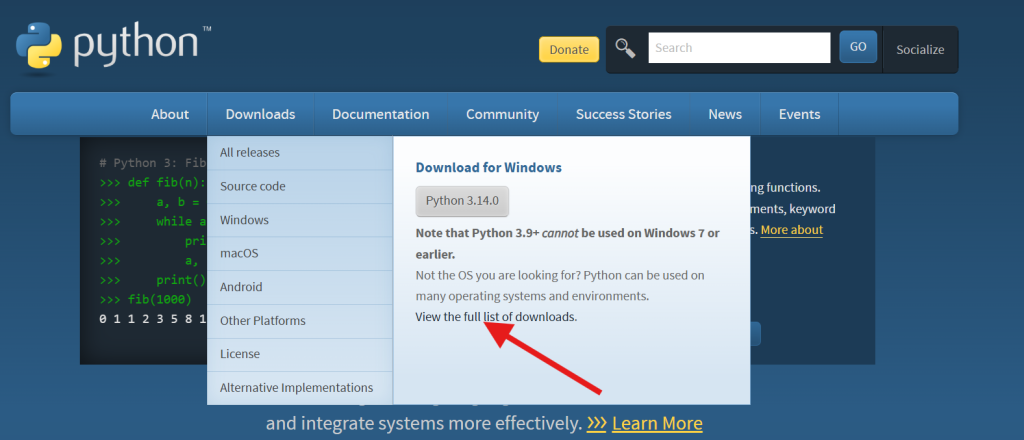
Choose a version between 3.9 and 3.13. I’d recommend Python 3.13 for a balance of recency and compatibility. Download the installer for your operating system (Windows, macOS, Linux).
Step 2: Install the Downloaded Python Version
Run the installer you just downloaded. Make sure to check the box that says “Add Python to PATH” during the installation process. This is crucial! It allows you to run Python from your command prompt without having to specify the full path to the Python executable. If you miss this step, you’ll have to add it manually later (more on that below).
Step 3: Update Environment Variables (If Necessary)
Sometimes, even after checking “Add Python to PATH,” you might still need to manually update your system’s environment variables. This ensures that your system knows where to find the newly installed Python version.
Here’s how to do it on Windows:
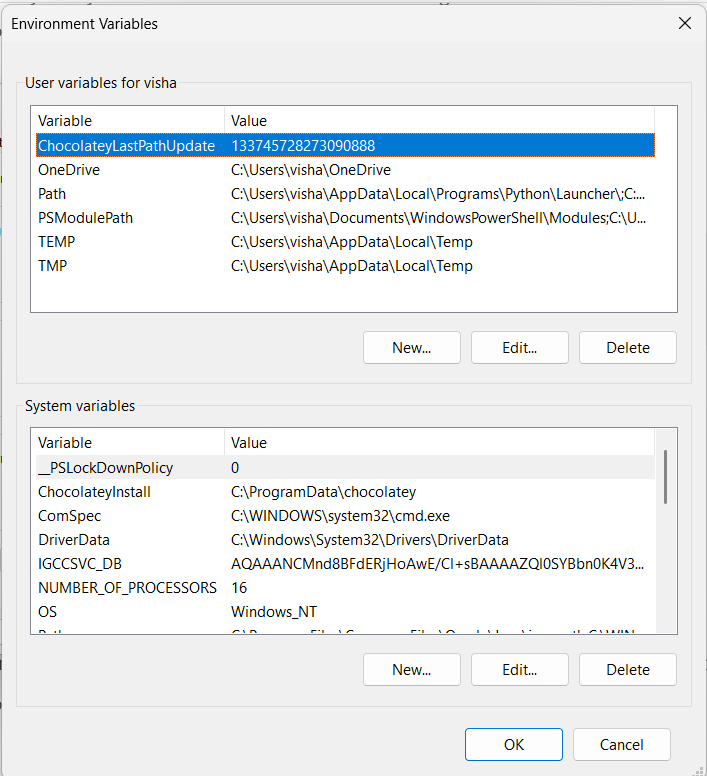
- Search for “environment variables” in the Windows search bar and click on “Edit the system environment variables.”
- Click on the “Environment Variables” button.
- In the “System variables” section, find the “Path” variable and double-click on it.
- You’ll see a list of paths. If you see paths to older Python versions, delete them.
- Click “New” and add the path to your new Python installation. This will typically be something like
C:\Users\YourUsername\AppData\Local\Programs\Python\Python313(replace “YourUsername” with your actual username and “Python313” with the correct version number). - Also, add a path to the “Scripts” directory within your Python installation. This will be something like
C:\Users\YourUsername\AppData\Local\Programs\Python\Python313\Scripts. - Click “OK” to save your changes.
If you’re on macOS or Linux, you’ll need to edit your .bashrc or .zshrc file (depending on which shell you’re using). Add the following lines to the end of the file, replacing /path/to/your/python with the actual path to your Python installation:
export PATH="/path/to/your/python:$PATH"
export PATH="/path/to/your/python/Scripts:$PATH"
Then, run source ~/.bashrc or source ~/.zshrc to apply the changes.
Step 4: Verify the Python Version
Open a new command prompt or terminal window (it’s important to open a new one so that the changes to your environment variables are applied). Type python --version and press Enter. You should now see the version number of the Python version you just installed.
If you’re still seeing the old Python version, double-check that you’ve correctly updated your environment variables and that you’ve closed and reopened your command prompt or terminal.
Step 5: Install TensorFlow (Again!)
Now that you have a compatible Python version installed and configured, try installing TensorFlow again:
pip install tensorflowFingers crossed, this time it should work! You should see pip downloading and installing TensorFlow and its dependencies.

Alternative: Using Virtual Environments
While downgrading your main Python installation works, it’s often cleaner and safer to use virtual environments. A virtual environment creates an isolated space for your Python projects, allowing you to install specific versions of packages without affecting your system-wide Python installation or other projects.
Here’s how to create and use a virtual environment:
- Create a virtual environment:
python -m venv myenvThis will create a directory called “myenv” (you can choose any name you like) that contains the virtual environment. - Activate the virtual environment:
- On Windows:
myenv\Scripts\activate - On macOS and Linux:
source myenv/bin/activate
- On Windows:
- Install TensorFlow within the virtual environment:
pip install tensorflowThis will install TensorFlow only within the virtual environment, leaving your system-wide Python installation untouched. - Deactivate the virtual environment:
deactivateWhen you’re finished working on your project, you can deactivate the virtual environment.
Virtual environments are a best practice for Python development, and I highly recommend using them for all your projects.
Troubleshooting Tips
- Check your pip version: Make sure you have the latest version of pip installed. You can update it using:
pip install --upgrade pip - Use the
--no-cache-dirflag: Sometimes, pip can have issues with cached packages. Try installing TensorFlow with the--no-cache-dirflag:pip install --no-cache-dir tensorflow - Specify the TensorFlow version: If you know a specific TensorFlow version that is compatible with your Python version, you can specify it during installation:
pip install tensorflow==2.10.0Replace2.10.0with the desired TensorFlow version.
Key Takeaways
- The “Could not find a version that satisfies the requirement TensorFlow” error usually means your Python version is incompatible with TensorFlow.
- TensorFlow officially supports Python versions 3.9 through 3.12, but Python 3.13 often works as well.
- You can fix this by installing a compatible Python version or using a virtual environment.
- Remember to update your environment variables if necessary.
- Virtual environments are a great way to isolate your Python projects and manage dependencies.
FAQ
Q: Why is TensorFlow so picky about Python versions?
A: TensorFlow relies on certain features and functionalities of Python. As Python evolves, TensorFlow needs to be updated to take advantage of these new features and maintain compatibility. This means that older versions of TensorFlow might not work with newer versions of Python, and vice versa.
Q: Can I have multiple Python versions installed on my system?
A: Yes, you can! This is where virtual environments come in handy. They allow you to create isolated environments for your projects, each with its own Python version and dependencies.
Q: I’m still getting the error after installing a compatible Python version. What should I do?
A: Double-check that you’ve correctly updated your environment variables and that you’re using the correct Python version in your command prompt or terminal. Also, try updating pip and using the --no-cache-dir flag.
Q: How do I find out which TensorFlow versions are compatible with my Python version?
A: The TensorFlow documentation (https://www.tensorflow.org/install) lists the supported Python versions for each TensorFlow version. You can also try searching online forums or communities for information on specific version combinations.
Q: Should I always use the latest version of TensorFlow?
A: Not necessarily. While the latest version often includes new features and improvements, it might also have bugs or compatibility issues. It’s often a good idea to stick with a stable, well-tested version.
Q: What if I need to use a specific version of TensorFlow for a project?
A: Virtual environments are your best friend in this case! You can create a virtual environment with the specific Python version required by the project and then install the desired TensorFlow version within that environment.
I hope this guide has helped you resolve the “Could not find a version that satisfies the requirement TensorFlow” error. Now go forth and build amazing things with TensorFlow! If you have any other questions, feel free to ask in the comments below.