
By Using SWAP Memory, to some extent you can prevent against the nasty out-of-memory errors in your applications or your website. First let’s talk about what SWAP memory or SWAP space is a little. In case you already know what it is and want to jump right to the tutorial, feel free to scroll down and skip this part.
WHAT IS SWAP SPACE/MEMORY?
Generally speaking SWAP Memory or SWAP Space is a designated area of the hard disk that is used to save data temporarily that the operating system can no longer store in the RAM. It does exactly what the name specifies, that is swap data in and out of memory. We know RAM is much faster that the hard disk, but in case it’s running low, the OS can use SWAP space so that you don’t get out of memory errors, it can be though of as substitute memory, not as fast, but does the job.
HOW DOES IT WORK?
If you have enabled SWAP Space(we’ll shortly see how) the kernel uses a program to detect the blocks of memory which haven’t been used for a while and it can then choose to swap these pages out to a partition on the hard drive that is specially designated for this purpose, hence the name SWAP Space. This allows the RAM to be used for more immediate tasks and the pages that are in the hard disk can be swapped back to the RAM when required.
So the total RAM or memory in a linux system can be considered as the total of RAM and this SWAP Space.
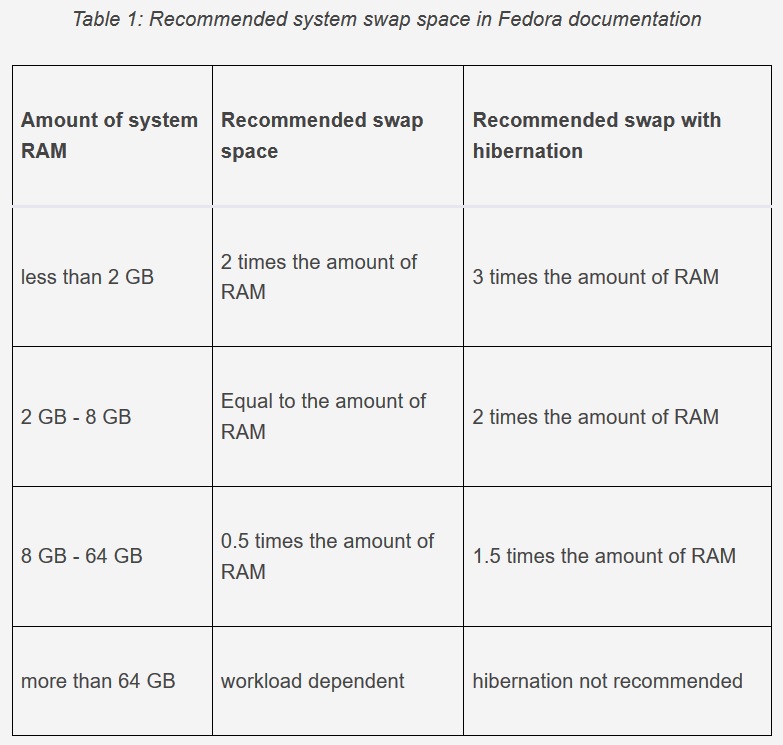
HOW MUCH HARD DISK SPACE SHOULD I ALLOCATE AS SWAP?
In the old times, where the RAM used to be very low, it was a general rule of thumb set the SWAP Space size to the double of whatever your RAM size was. But currently we have a lot of systems that have more that 32GB of RAM 2GB RAM is considered low and are commonplace in the cheapest systems and virtual private servers that we can purchase.
Times have changed as you’ve seen, how much swap space you need for your demands definitely depends on your needs but here’s a generic table that might help you to make that decision.
 |
| Linux Swap Space Recommendation |
Now that you know how much space you need, let’s finally get to the good stuff
Add Swap Space in Ubuntu 18.04
Fire up your terminal then, but make sure you are sudo!
PS: If you are a video person, you can check the full video tutorial too:
- Check if SWAP file already existsFirst we check if there’s already a swap space configured using the following command:
sudo swapon --showIf you dont’t have any swap configured then you show see empty result as shown in this image:

swapon –show - Create a SWAP fileNow you need to create a SWAP file because you don’t have one. For the purpose of this tutorial, we’ll assume the the swap file needs to be of 1 GB, you can increase or decrease this according to your requirement. Do check the figure above to check how much swap space might be required for your system. To creae a swap file, you need to enter the to use the
fallocatecommand as such:sudo fallocate -l 1G /swapfileIf the file is successfully created, you should be able to see it. Now we have create the swap file in the root directory as defined by ‘/swapfile’, you can add in directory you like by giving the path like ‘/path/to/directory/swapfile’. Dols -lin the root directory and you should be able to see the following:SWAP FILE Now we have allocated 1 GB of space for our swap file. - Give appropriate permission to the SWAP file Now that we have created a swap file that we want to use for your swapping purposes, we need to make sure that no one, other that the OS kernal itself can read to write to it. So to do that we need to change the permission of the swap file.
First make sure you are in the directory that contains the swap file then we will usechmodto change the permission.sudo chmod 600 /swapfileBy running the command above, we make sure that the file is only readable and writeable by root. To verify your command is successful, do
ls -lhand you’ll see rw permission as show below:SWAP FILE with 600 Permission - Enable the SWAP file
Excellent, we now have create the SWAP file and given it appropriate permission such that only the root can access it. Now we need to enable the swap file so that the kernal can actually use it. To enable the swap file, we need to mark the file for swap usage by using themkswapcommand:sudo mkswap swapfileIf the command is successful, you’ll get output similar to the following:
Setting up swapspace version 1, size = 1024 MiB (1073737628 bytes)
no label, UUID=6e2565805-2ab9-450f-aed6-24589d566b55f
Once we marked the swap file for usage by kernal, use the followingswaponcommand to enable the swap filesudo swapon /swapfileTo verify that the SWAP file is successfully create, we can run the following command that we used to check in step 1.
sudo swapon --showIf you have followed up completely, and marked the swap file and then enable the swap file, you’ll see output similar to this:
NAME      TYPE  SIZE USED PRIO
/swapfile file 1024M   0B   -1
And do check the free memory using the ls -lh, and you’ll finally the the swap file now! Voila.
SWAP memory But wait for a minute, all is not complete, you must do the next step otherwise the swap configuration will be lost in the reboot.
- Make the SWAP file permanentAs you’ve seen now, the SWAP file is ready as being used. But, as mentioned above, if you end the session and reboot, the changes will be lost. If you don’t worry about that, and you just needed swap file for the current sessions for reasons I cannot know, this is it. You’re done, but if you’re like most you want the changes to be permanent, and now we’re going to learn exactly how to do that. To do that we change our
/etc/fstabfile. But before editing the file, let’s back it up so if we mess up, we’ll have a backup. Copy/etc/fstabusing the following command:sudo cp /etc/fstab /etc/fstab.bakNow that we have our backup ready, time to be fearless and edit the file. You can open the file in the editor of your choice, we’re going to to than in vim and enter the following line at the bottom of the file:
/swapfile none swap sw 0 0After adding the line, this is what my fstab file looks like:
FSTAB File We can now save and quit and our changes for the SWAP config will be permanent, but for you enthusiasts our there, the next section is how we can adjust the swappiness value. It means how often should your system swap the data out of the RAM to the swa
p file. - Adjust swapiness as required.Now we can define how often should our system swap data from RAM to SWAP using the swappiness value, it ranges from 0 to 100 and represents a percentage.
As you know now, moving the data from RAM to swap and back to RAM quite a time consuming and heavy process. It can dramatically slow down your performance if this happens quite often. A swappiness value of 0 means that the kernal will only move data to swap space only when absolutely necessary, and a higher swappiness value means that the kernal will swap data to the swap file more often to free up more space.
In desktop computers a swappiness value of around 50-60 should be fine, but in server computer a lower swappiness value in the range of 10-0 is generally better.
To change the swappiness value, you can run the following command:sudo sysctl vm.swappiness=10And you can check the value change using the following command:
cat /proc/sys/vm/swappinessAs with our swap config above, this value is also reset at reboot and if you want the value to persist, you can automatically change it whenever the system is rebooted.
To do so, we need to edit the sysctl.conf file and add swappiness value there. So let’s open the file using the following command:
sudo vim /etc/sysctl.confThen just add the following at the bottom of the file:
vm.swappiness=10Save and quit the file and you’re done! Voila.
So in this tutorial if we’ve learnt how to add and configure the swap file in Ubuntu 18.04. I hope I was able to help you out with this, and if you want to learn more about Linux, I highly recommend the following books, if interested do buy from the links below and help me support this site.If you have any queries of questions, let me know I’ll answer them to the best of my abilities.


Hi, nice article, thanks. Looks like there is a little inconsistency. The command "/swapfile none swap sw 0 0" does not fit the graphics below where it states "/swapfile swap swap defaults 0 0"