

Welcome to this comprehensive tutorial on building CRUD Restful APIs using Flask. In this tutorial, I will walk through the process of creating a Flask application from scratch and implementing the CRUD (Create, Read, Update, Delete) operations. By the end of this tutorial, you will have a clear understanding of how to build Restful APIs using Flask and be able to apply this knowledge to your own projects.
I’ve also created a video tutorial on YouTube. You can check it out here:
Setting up the Development Environment
I am assuming that you already have python Installed. To begin, let’s set up the development environment for our Flask application. Follow these steps:
- Install Flask using pip:
pip install Flask - Create a new directory for your Flask project.
- Create a virtual environment:
python -m venv venv - Activate the virtual environment:
- On Windows:
venv\Scripts\activate - On macOS/Linux:
source venv/bin/activate
- On Windows:
Creating a Flask Application
Now, let’s create a Flask application by following these steps:
- Create a new Python file, e.g.,
app.py, in your project directory. - Import the necessary modules:
from flask import Flask, jsonify, request - Initialize the Flask app:
app = Flask(__name__)
Your app.py file should look like this now:
from flask import Flask, request

app = Flask(__name__)
Implementing CRUD Operations in Flask App
Next, we’ll implement the CRUD operations using Flask. Follow these steps:
Creating a Data Store
To keep things simple, we’ll use a dictionary to store our data. In the app.py file, create a dictionary called users that will hold the user information.
users = {
    1: {'id': 1, 'name': 'John Doe', 'email': 'johndoe@example.com'},
    2: {'id': 2, 'name': 'Jane Smith', 'email': 'janesmith@example.com'}
}
Retrieving All Records (GET request)
Create a route and a function to handle the GET request for retrieving all user records. Inside the function, return the users dictionary as a JSON response.
@app.route('/users', methods=['GET'])
def get_all_users():
    return users
This is it! You already have your first Flask REST API ready. This will list all the available books. Now you can just do the following and test the APIs:
- Open terminal in your project directory
- If you have installed Flask in Virtual Environment, activate the virtual environment. The command will depend on your operating system:
- Windows: venv\Scripts\activate
- Linux/MacOS: venv\Scripts\activate
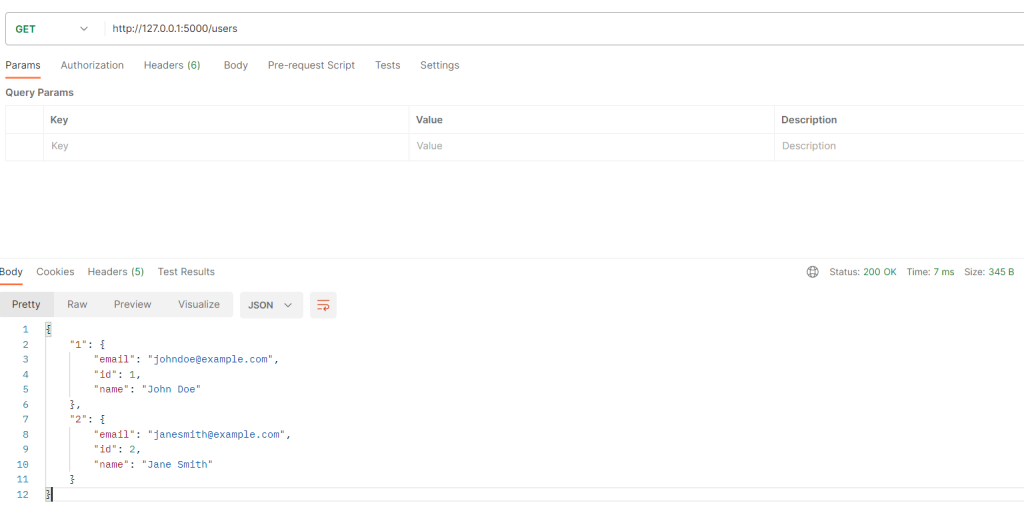
- After Activating the virtual environment, just run this command: python app.py and you app will be running, now you can test the API you just created using a browser or postman. You should see the result like this.

Retrieving a Specific Record (GET request)
Create a route and a function to handle the GET request for retrieving a specific user record based on the user_id parameter. Inside the function, retrieve the user information from the users dictionary using the provided user_id and return it as a JSON response.
@app.route('/users/<int:user_id>', methods=['GET'])
def get_user(user_id):
    user = users.get(user_id)
    if user:
        return user
    else:
        return {'error': 'User not found'}
Creating a New Record (POST request)
Create a route and a function to handle the POST request for creating a new user record. Inside the function, retrieve the user information from the request’s JSON payload, generate a new user_id, create a new user dictionary, add it to the users dictionary, and return the newly created user as a JSON response.
@app.route('/users', methods=['POST'])
def create_user():
    data = request.get_json()
    user_id = len(users) + 1
    user = {'id': user_id, 'name': data['name'], 'email': data['email']}
    users[user_id] = user
    return user
Updating a Record (PUT request)
Create a route and a function to handle the PUT request for updating an existing user record. Inside the function, retrieve the user information from the request’s JSON payload and update the corresponding user record in the users dictionary. Return the updated user as a JSON response.
@app.route('/users/<int:user_id>', methods=['PUT'])
def update_user(user_id):
    user = users.get(user_id)
    if user:
        data = request.get_json()
        user['name'] = data['name']
        user['email'] = data['email']
        return user
    else:
        return {'error': 'User not found'}
Deleting a Record (DELETE request)
Create a route and a function to handle the DELETE request for deleting a user record. Inside the function, remove the user record from the users dictionary based on the provided user_id. Return a success message as a JSON response.
@app.route('/users/<int:user_id>', methods=['DELETE'])
def delete_user(user_id):
    user = users.pop(user_id, None)
    if user:
        return {'message': 'User deleted successfully'}
    else:
        return {'error': 'User not found'}
Run the Flask CRUD Application
Now you can run the whole application and test all the APIs. Here’s how you can run the application:
- Save the modified code in a file with a
.pyextension (e.g.,app.py). - Open a terminal or command prompt and navigate to the directory where the file is saved.
- Activate the virtual environment. The command will depend on your operating system:
- Windows: venv\Scripts\activate
- Linux/MacOS: venv\Scripts\activate
- Start the Flask development server using the following command: python app.py
Flask will start the server, and you should see output similar to:


You may also like:
What is CORS errors in Rest APIs
Conclusion – RESTFul CRUD APIs using Flask
Congratulations! You’ve learned how to build a simple CRUD Restful API using Flask and a dictionary as the data store. This tutorial provided step-by-step instructions for setting up the development environment, creating a Flask application, and implementing the CRUD operations. You can now apply this knowledge to create your own Restful APIs with Flask.
Remember, this tutorial only scratched the surface of what you can achieve with Flask. Explore additional features like database integration, testing, authentication, and authorization to enhance your Flask applications further. Happy coding!