Creating a basic but functional Location Tracker app in Android is not much work, you can do it within an hour! Just follow the following tutorial. Here we will create an Android App that will access GPS or Network to figure out your current location and keep updating the Marker on the map to give the effect of “Tracking”. We will be using Google Maps Android API, Android Studio and an Android Phone to test.
Note – Find Source code of this location tracker app at the end of this article
Let’s begin to create our very own Location Tracker App! Create a new project and Select the Google Maps Activity as shown in the figure below and just click next on the corresponding options and click on finish. Doing this gives us a template that already has a layout with maps fragment and an associated activity with the marker placed somewhere over Australia! We can run this app now by just adding our API_KEY.
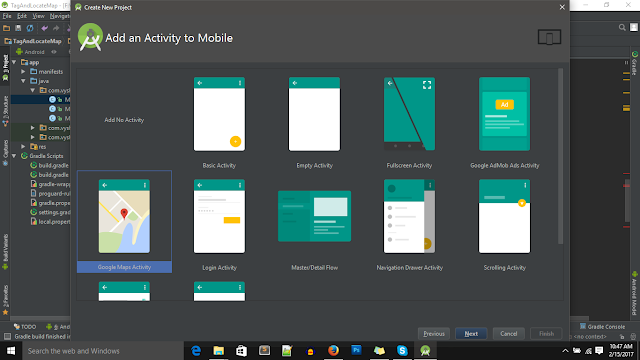  |
| Creating new MapsActivity Project |
You will see a screen like this, at the second last line, notice YOUR_KEY_HERE. You need to get the API key for using google maps API for Android. You will need Google Maps to display your location on the map.
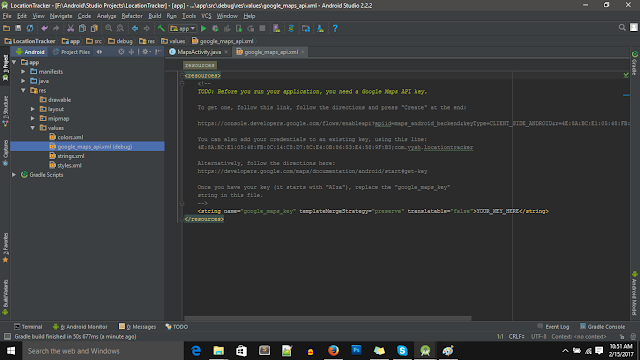  |
| API_KEY |
To get the API Key, go to this link – Google Maps Android API, and a webpage like the one below will open up. Now just click on the Maps link(The first option form the bottom image row). Update – Now you can click on GET A KEY button on top right, next to pricing and plans button.If you do this, skip the next step.
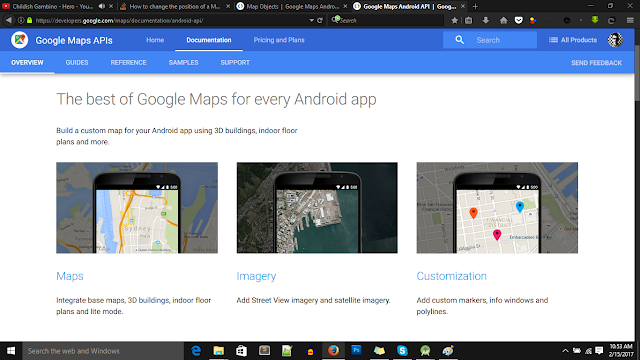  |
| Official Google Maps website |
Now if you can see a page like this, click on the GET A KEY button right next to View Pricing and Plans button on the top right corner of the page.
  |
| Getting google maps API Key |
Now you will be show a dialog box like the one shown below, here you need to give the project name for which you will be using Google Maps.
  |
| Google Maps App Project Name |
After you enter a valid project name, you will be shown a new dialog box with the you API KEY, Bravo. Now you can finally start coding you own Location Tracker app for Android. Copy the API_KEY shown to you in the dialog box, you will need it in the next step.
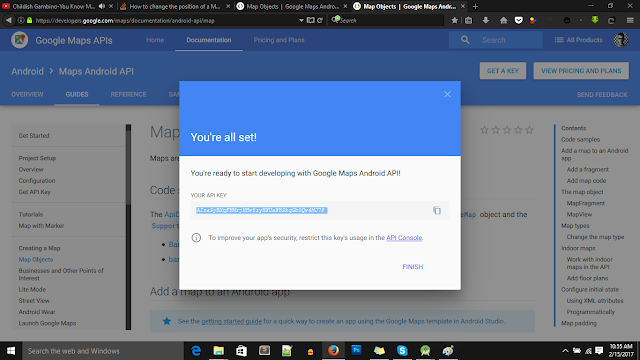  |
| Google Maps Android API Key |
Now we are back in Android Studio, let’s begin where we left off. Paste the API KEY that you copied from the dialog box in the previous step in the highlighted part shown in the screenshot below.
At this point we already have a functional app that puts the Marker over some place in Australia. The marker is static and you can change it to be placed over any place by defining the coordinates in the MapsActivity. You can run and test this app now, just add the following permissions in the Manifest :
<uses-permission android:name=”android.permission.ACCESS_FINE_LOCATION” />
<uses-permission android:name=”android.permission.INTERNET”/>
  |
| Android Studio Google Maps API Key |
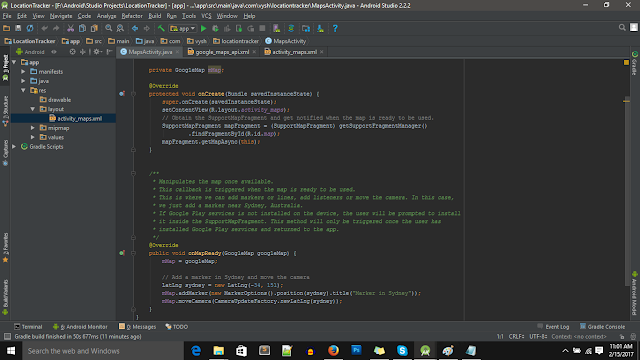
Now open your activity_maps.xml from the layouts folder inside res folder. It should look like the image shown below.
  |
| MapsActivity |
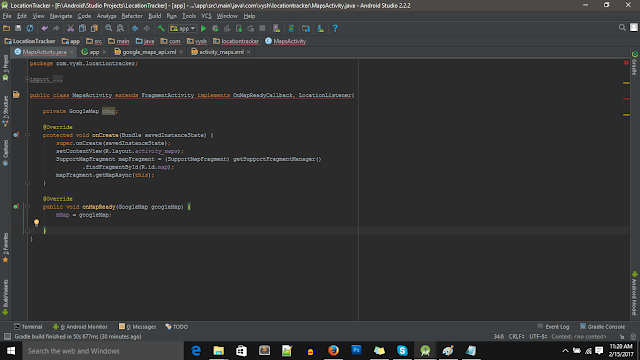
Now finally we can start some actual coding! Read, keep or remove the pre defined comments, I choose to remove it. Now create a new GoogleMap variable mMap and implement LocationListener. You need the LocationListener to be notified whenever your location changes. The implementation will show some error for now, it’s because we haven’t implemented the required methods yet.
  |
| Location Listener |
To remove that error, implement all the required methods. Click ALT + Enter and you will be shown list of all the methods that can be implemented. Select all of them and click Enter. You will see the following methods and the error will have been resolved. Although there are a bunch of methods, we will only be using onLocationChanged which is called whenever new location data is received by the device. Here we handle what to do with the new data, put the marker over that point or do whatever you want with it.
  |
| Implementing location listener methods |
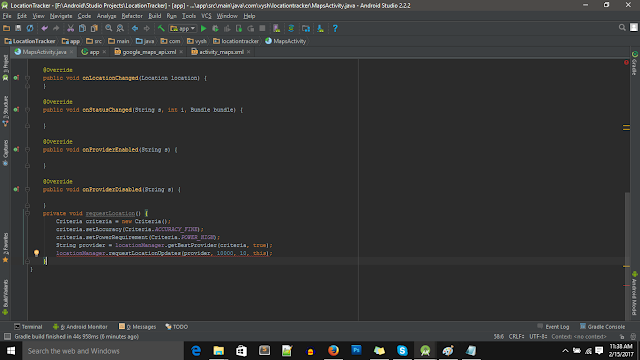
Now, create your own method called requestLocation. This method will be responsible for setting the criteria of the location requests that you will make. Criteria defines the accuracy level required and the power level required. According to your criteria the Android system automatically chooses GPS or Network for getting the your location so that you can focus on what you want rather that choosing the tool that you will be using.
  |
| LocationManager and Criteria |
Now you need to call the requestLocation method so the the device can try to figure out your location. But first you need to do some preparations, if you want your app to run on devices running Marshmallow or higher, you need to take care of Run Time permissions. To learn more about run time permissions, read this post – Marshmallow Runtime Permissions.You also need to add a new global Marker and MarkerOptions variable as you want to update the position of the same marker not create a new marker every time your position is changing. Initially we’ve set the marker position to 0,0. You’ll see a lot of error for now as all the methods we’ve call are not yet defined. They are defined at the end of this tutorial. Write the code shown below in the screen shot.
  |
| Location Service Permissions |
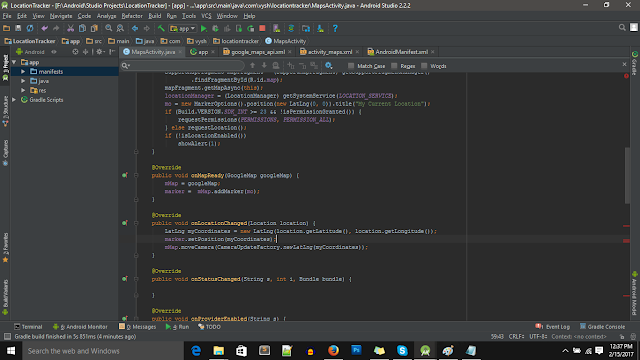
Since you have now called the requestLocation methods which requests your current location from the LocationManager, you can get you location data any second, so you need to handle your location data in the onLocationChanged method. Add the code shown below in onLocationChanged and add the marker to that place in the onMapReady.
  |
| Adding Marker on Map |
Here’s the code for the isLocationEnabled and isPermissionGranted method. isLocationEnabled checks if the location information can be given to apps i.e if apps are allowed to get the location information or not. isPermissionGranted method checks specifically for your app if your app is allowed to access location services or not. If not allowed it requests the permissions to the user.
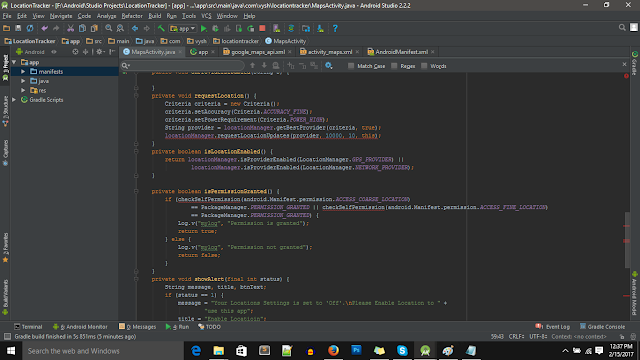  |
| Checking if location service is enabled |
Finally here’s the code of showAlert. It shows a dialog box if the location services in your device is turned off, i.e if apps are not allowed to access you current location data. If the user choose to give the permissions then he/she is directly taken to the location setting options.
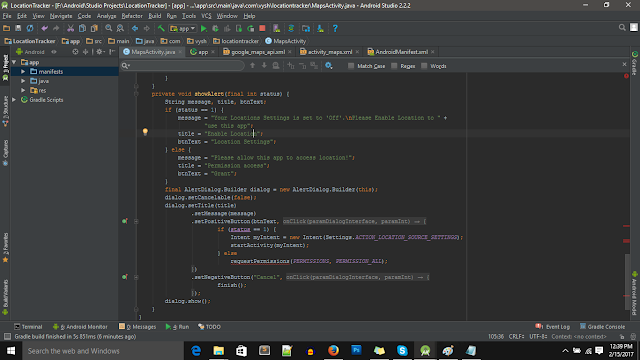  |
| Showing Dialog Box |
Finally our app is done! it wasn’t that complex, was it? We have our own Location Tracker app which updates the marker in the map according to our position. The marker changes the position abruptly but the app tracks the location just fine. We can work on the smoothness of the change of marker’s location some other time. Happy coding, if you have any problems, don’t hesitate to comment below.
Download the Source Code : Download Location Tracker Project Files

i can't able to download…
same here im also not able to download,
plz provide me the download link…
DSownload Link : http://www.filefactory.com/file/60ov2agxtdxt/LocationTracker.rar
DSownload Link : http://www.filefactory.com/file/60ov2agxtdxt/LocationTracker.rar
Hello and thank you for your tutorial! The application after having permission to use location isn't updating the marker location, isn't that suppose to happen?
Thanks for the help
Hi, Have you included the API Key? In this version you need to restart the app after getting permissions in order to receive location updates. If your location is still not updating make sure the requestLocation method is being called and you are receiving location updates by adding logs.
Hello, I can't download the source code.. Can anyone help please?
Here's the download link : http://www.filefactory.com/file/60ov2agxtdxt/LocationTracker.rar
Hey i unable to download this app, url is blocked , please help me out
not possible to download code, check your link for downloads
Check the link, it's working now
Thank you for this tutorial before. I want ask a few question, If i want to track another person location, what i should modify and is there any tutorial like this ? Sorry about my english. Im a beginner before. Thank you.
Link are not working
How to get a source code of this project
need the code please
You are sharing excellent information. The way of content delivery is good, excellent in formation.
SMO Company in Chennai
google adwords company in Chennai
google adwords Services company in Chennai
You have shared an useful post. I am truly impressed by the details which you have provided in your post. Nice article for Movement tracking with Google Map which is my interest. Thank you.
Nice article, which you have shared here. Your article is very informative and I liked your way to express your views in this post. The article you have shared here is very informative and the points you have mentioned are very helpful. Thanks for sharing this article here. Android development agency
Pretty good post. I just stumbled upon your blog and wanted to say that I have really enjoyed reading your blog posts. Any way I'll be subscribing to your feed and I hope you post again soon. Big thanks for the useful info. tracking devices
how to track an iphone I admire this article for the well-researched content and excellent wording. I got so involved in this material that I couldn’t stop reading. I am impressed with your work and skill. Thank you so much.
With every opportunity comes a great risk. When talking about the reports pro apk Android phone we have a lot of apps which have a lot of opportunities, with each app there are a lot of risks. Let me talk about the Virus removal activities first.
how to track over device on phone
Hi, nice post. Well what can I say is that these is an interesting and very useful information. It's very helpful for delivery bussiness owners. Glad to come across this, great blog for latest web development trends in 2022. Thanks for sharing this article here.
Bollywood is one of the most influencing forces behind the latest fashion. Young girls and boys follow Bollywood fashion trends blindly. They follow trends set to coach bus simulator mod free download by their favorite Bollywood actor and actresses.