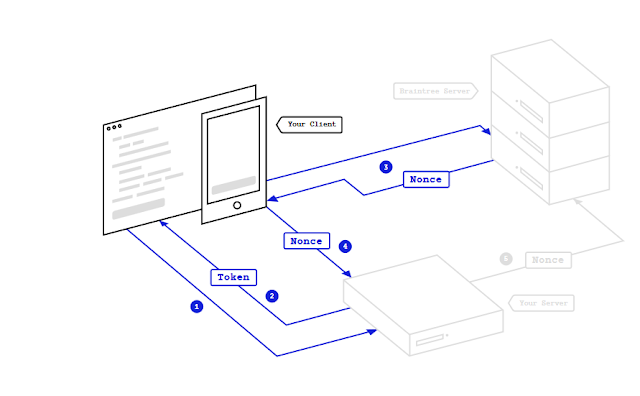
- Our app requests the token from Server.
- The server generates a token using Braintree’s SDK and sends it back to the android app).
- The app then gets the user’s credit card info and then contacts the Braintree server to receive a payment nonce.
- After the app receives the payment nonce from the Braintree server, it will contact our own server with payment amount and Nonce. (The server then handles payment and has to send information to the app whether the payment was successful of not)
  |
||
| Braintree integration in Android app server side (Pic courtesy: Braintree) |
- The server receives token request from the client (Our Android app).
- Server generates the token and sends back the token to app.
- (Step 4 in image above)The server receives the payment details and nonce from the client app.
- (Step 5 in image above)Our server contacts the Braintree server with Nonce and get response if the payment was successful or not.
Now that we have understood how the payment process works, let’s start with some actual coding, first let’s do the client side.
Steps to Integrate Braintree Payment in Android App (Client Side).
First of all, let’s add dependencies for using Braintree. We will also add dependency for using Volley using which we will create API requests. Add the dependencies in app level Gradle file as shown below. Dependencies are :
compile 'com.braintreepayments.api:drop-in:3.+ compile 'com.android.volley:volley:1.0.0'Now let’s create layout for the app, we have a simple layout with an EditText where the user will enter the amount to pay and a button to make the payment.
<?xml version="1.0" encoding="utf-8"?>
<LinearLayout xmlns:android="http://schemas.android.com/apk/res/android"
    android:layout_width="match_parent"
    android:layout_height="match_parent"
    android:gravity="center"
    android:orientation="vertical"
    android:padding="16dp">
<LinearLayout
android:id="@+id/llHolder"
android:layout_width="match_parent"
android:layout_height="match_parent"
android:gravity="center"
android:orientation="vertical"
android:visibility="gone">
<TextView
android:id="@+id/tvMessage"
android:layout_width="match_parent"
android:layout_height="wrap_content"
android:gravity="center"
android:text="Ready for transaction"
android:textSize="18sp"
android:textStyle="bold" />
<android.support.design.widget.TextInputLayout
android:layout_width="match_parent"
android:layout_height="wrap_content"
android:layout_margin="16dp">
<EditText
android:id="@+id/etPrice"
android:layout_width="match_parent"
android:inputType="text"
android:imeOptions="actionDone"
android:layout_height="wrap_content"
android:gravity="center"
android:hint="Choose the amount to pay" />
</android.support.design.widget.TextInputLayout>
<Button
android:id="@+id/btnPay"
android:layout_width="148dp"
android:layout_height="wrap_content"
android:layout_marginTop="16dp"
android:background="@color/colorPrimaryDark"
android:text="Pay"
android:textColor="@android:color/white" />
</LinearLayout>
</LinearLayout>
Notice that we’ve added visibility:gone in our nested linear layout as we first want to get the token from server, only then we want to show form to user to make payments as we need token for payments and we cannot make payments through Braintree without tokens. Once we get the token, we set its visibility to visible.
Now we will create the MainActivity.java. Here’s the code for it:
Note: As we have not created APIs yet for getting token, we will leave that variable empty for now. After we create APIs we will add our API.
Steps in this Activity:
- We first call our API that will get the client token using an Async class(API is created at the end of this post).
- Once we’ve successfully got the client token, we can use that to make payments using Braintree. So we set the visibility of the form to Visibile so that user can enter the amount to pay.
- Once user click’s the pay button, we present user a DropInForm. DropInForm is Braintree’s default form where user need to enter their credit card details. It’s Braintree’s default implementation to get user card data. Once the user enters his/her details, the details are directly sent to Braintree’s server and the server returns a Nonce to the app.
- Once the Nonce is received from the Braintree server, we send the Nonce along with the amount that user has entered in the 2nd step to our own server using an API that we’ll create in the end of this post.
- Finally we receive reply from our server regarding the payment.
public class MainActivity extends AppCompatActivity {
final int REQUEST_CODE = 1;
final String get_token = "YOUR-API-TO-GET-TOKEN";
final String send_payment_details = "YOUR-API-FOR-PAYMENTS";
String token, amount;
HashMap<String, String> paramHash;
Button btnPay;
EditText etAmount;
LinearLayout llHolder;
@Override
protected void onCreate(@Nullable Bundle savedInstanceState) {
super.onCreate(savedInstanceState);
setContentView(R.layout.main_activity);
llHolder = (LinearLayout) findViewById(R.id.llHolder);
etAmount = (EditText) findViewById(R.id.etPrice);
btnPay = (Button) findViewById(R.id.btnPay);
btnPay.setOnClickListener(new View.OnClickListener() {
@Override
public void onClick(View v) {
onBraintreeSubmit();
}
});
new HttpRequest().execute();
}
@Override
protected void onActivityResult(int requestCode, int resultCode, Intent data) {
if (requestCode == REQUEST_CODE) {
if (resultCode == Activity.RESULT_OK) {
DropInResult result = data.getParcelableExtra(DropInResult.EXTRA_DROP_IN_RESULT);
PaymentMethodNonce nonce = result.getPaymentMethodNonce();
String stringNonce = nonce.getNonce();
Log.d("mylog", "Result: " + stringNonce);
// Send payment price with the nonce
// use the result to update your UI and send the payment method nonce to your server
if (!etAmount.getText().toString().isEmpty()) {
amount = etAmount.getText().toString();
paramHash = new HashMap<>();
paramHash.put("amount", amount);
paramHash.put("nonce", stringNonce);
sendPaymentDetails();
} else
Toast.makeText(MainActivity.this, "Please enter a valid amount.", Toast.LENGTH_SHORT).show();
} else if (resultCode == Activity.RESULT_CANCELED) {
// the user canceled
Log.d("mylog", "user canceled");
} else {
// handle errors here, an exception may be available in
Exception error = (Exception) data.getSerializableExtra(DropInActivity.EXTRA_ERROR);
Log.d("mylog", "Error : " + error.toString());
}
}
}
public void onBraintreeSubmit() {
DropInRequest dropInRequest = new DropInRequest()
.clientToken(token);
startActivityForResult(dropInRequest.getIntent(this), REQUEST_CODE);
}
private void sendPaymentDetails() {
RequestQueue queue = Volley.newRequestQueue(MainActivity.this);
// Request a string response from the provided URL.
StringRequest stringRequest = new StringRequest(Request.Method.POST, send_payment_details,
new Response.Listener<String>() {
@Override
public void onResponse(String response) {
if(response.contains("Successful"))
{
Toast.makeText(MainActivity.this, "Transaction successful", Toast.LENGTH_LONG).show();
}
else Toast.makeText(MainActivity.this, "Transaction failed", Toast.LENGTH_LONG).show();
Log.d("mylog", "Final Response: " + response.toString());
}
}, new Response.ErrorListener() {
@Override
public void onErrorResponse(VolleyError error) {
Log.d("mylog", "Volley error : " + error.toString());
}
}) {
@Override
protected Map<String, String> getParams() {
if (paramHash == null)
return null;
Map<String, String> params = new HashMap<>();
for (String key : paramHash.keySet()) {
params.put(key, paramHash.get(key));
Log.d("mylog", "Key : " + key + " Value : " + paramHash.get(key));
}
return params;
}
@Override
public Map<String, String> getHeaders() throws AuthFailureError {
Map<String, String> params = new HashMap<>();
params.put("Content-Type", "application/x-www-form-urlencoded");
return params;
}
};
queue.add(stringRequest);
}
private class HttpRequest extends AsyncTask {
ProgressDialog progress;
@Override
protected void onPreExecute() {
super.onPreExecute();
progress = new ProgressDialog(MainActivity.this, android.R.style.Theme_DeviceDefault_Dialog);
progress.setCancelable(false);
progress.setMessage("We are contacting our servers for token, Please wait");
progress.setTitle("Getting token");
progress.show();
}
@Override
protected Object doInBackground(Object[] objects) {
HttpClient client = new HttpClient();
client.get(get_token, new HttpResponseCallback() {
@Override
public void success(String responseBody) {
Log.d("mylog", responseBody);
runOnUiThread(new Runnable() {
@Override
public void run() {
Toast.makeText(MainActivity.this, "Successfully got token", Toast.LENGTH_SHORT).show();
llHolder.setVisibility(View.VISIBLE);
}
});
token = responseBody;
}
@Override
public void failure(Exception exception) {
final Exception ex = exception;
runOnUiThread(new Runnable() {
@Override
public void run() {
Toast.makeText(MainActivity.this, "Failed to get token: " + ex.toString(), Toast.LENGTH_LONG).show();
}
});
}
});
return null;
}
@Override
protected void onPostExecute(Object o) {
super.onPostExecute(o);
progress.dismiss();
}
}
}
Steps to Integrate Braintree Payment in Android App (Server Side – PHP).
Getting Braintree API Key Credentials:
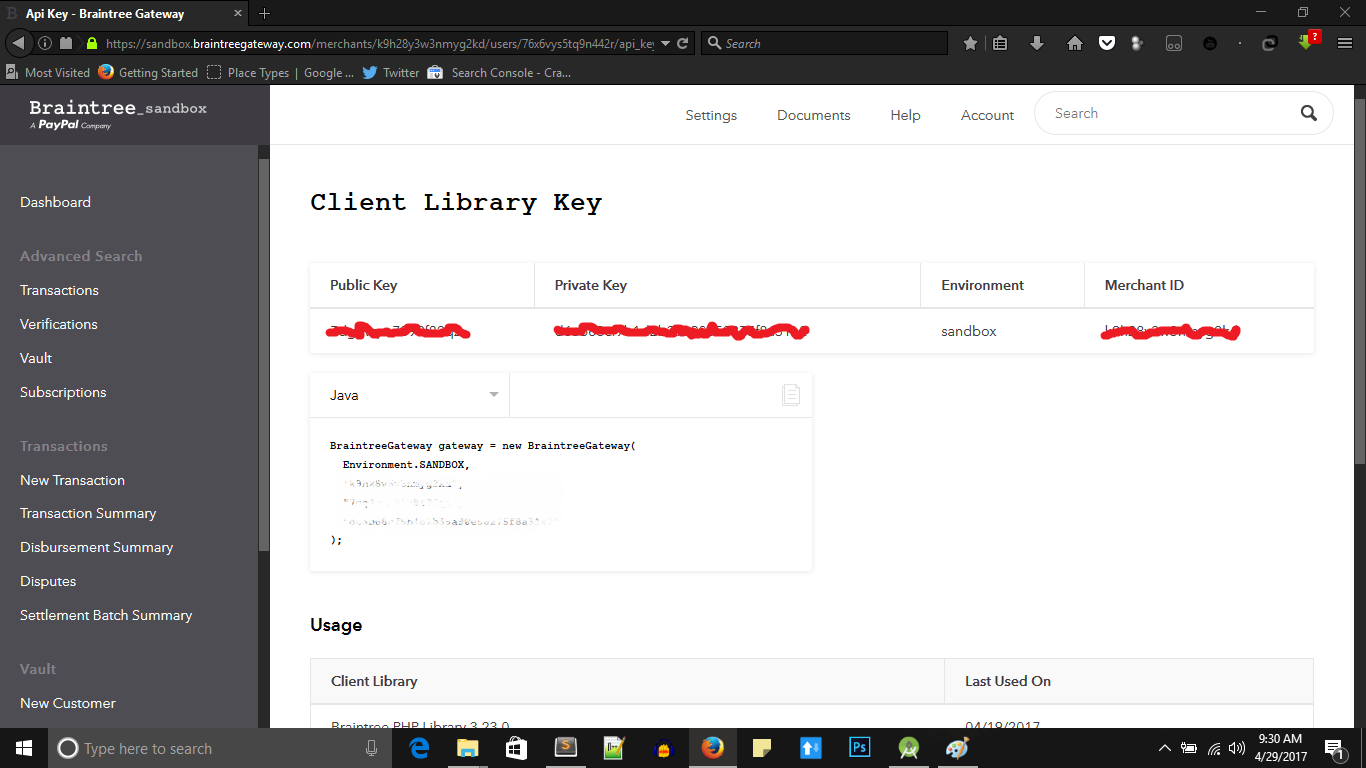
To get started with back-end first we need to create a Braintree account. Go to Braintree and create a new account if you don’t have one already, then login to the Braintree control panel. Then hover over account on top navigation bar and click on my user. You will see a page similar to this. Then click on view right next to the public key.
Once you clicked on view you will see a page similar to this, select PHP as the language above the details that are provided. You will need these details in the next step.
Server Side coding in PHP:
Steps involved in server side development:
Note: I’ve used XAMPP for server side functionality. The following will assume you have installed XAMPP.
- Download Braintree’s PHP SDK, I do it using composer.
- Create API for sending token.
- Create API for receiving payment details and sending Braintree server’s reply.
Let’s use composer for downloading Braintree’s PHP SDK. Download composer from here: Composer.
After downloading, install composer. Create a folder inside C:xampphtdocs. I’ve named it BraintreePayments. Now create a composer.json file in your root directory (BraintreePayments). Copy this inside the file.
{
“require” : {
“braintree/braintree_php” : “3.23.0”
}
}
<?phpsession_start();Check the step above this one to check how to get you API credentials. Once your saved this file, go back to the root directory. Create a new file, call it main.php and write the following code in it:
require_once("vendor/autoload.php");
if(file_exists(__DIR__ . "/../.env")) {
$dotenv = new DotenvDotenv(__DIR__ . "/../");
$dotenv->load();
}
Braintree_Configuration::environment('sandbox');
Braintree_Configuration::merchantId('YOUR-MERCHAND-IT');
Braintree_Configuration::publicKey('YOUR-PUBLIC-KEY');
Braintree_Configuration::privateKey('YOUR-PRIVATE-KEY');
?>
<?php
require_once ("include/braintree_init.php");
require_once 'vendor/braintree/braintree_php/lib/Braintree.php';
echo ($clientToken = Braintree_ClientToken::generate());
?>
This code simply echos (Displays) the clientToken, but when we call this file from our Android Device we will receive this token and we can use it further for contacting Braintree’s server.
After main.php is ready, create a new file name it checkout.php. This file will deal with getting payment amount and Nonce from the client and sending it to the Braintree server. It will receive the reply from Braintree server and we can take steps accordingly. In this example, we don’t parse the reply from server. We will straight away send the response to our App and if it contains the text successful, we will toast payments was successful, or else, payment failed.
Here’s the code for checkout.php:<?php
require_once ("include/braintree_init.php");
require_once 'vendor/braintree/braintree_php/lib/Braintree.php';
$nonce = $_POST['nonce'];
$amount = $_POST['amount'];
$result = Braintree_Transaction::sale([
'amount' => $amount,
'paymentMethodNonce' => $nonce,
'options' => [
'submitForSettlement' => True
]
]);
echo $result;
?>
Finally we are ready, we have created the app and we have also done the server side coding. But to use test this app we need to do one more thing, Start XAMPP and find out you ip address(Type ipconfig in terminal) and set the get_token variable that we created in the MainActivity.java to http://YOURIP/YOUR-ROOT-FOLDER/main.php and set send_payment_details variable to http://YOURIP/YOUR-ROOT-FOLDER/checkout.php. Bravo, we done it. Now build and test you app!
Download full Android app with Braintree Integration: BraintreePayments
Server Side Code: BraintreePaymentsServer.
In case you are wondering what the Braintree’s server replies to our server, here’s what it looks like, in actual production this needs to be properly parsed by the server, but we are just sending it to our Android app and if it contains the word successful, we show a toast message as Payment successful.


Thank you so much for sharing this worth able content with us. The concept taken here will be useful for my future programs and i will surely implement them in my study. Keep blogging article like this.
ESTIMATES
Hello dear friend, i really appreciate your guidance, it is well structured. I wish to talk to you directly this is my whatsapp number +25775913502. Thank you so much once again.
nice no one doing this kind of content with clarity
sometime i am getting volley server error when I am going to pay via pay pal
How to get payment id in android?