
Do you want to work on a project with others? Maybe you want to help improve an open-source project online? Then you need to learn about Pull Requests (PRs). A Pull Request is how you suggest changes to a project’s main code. It lets others review your work before it becomes part of the main project. This guide will walk you through creating your first Pull Request in GitHub, step-by-step, using Visual Studio Code. It is perfect for beginners and anyone new to contributing.
Get Started: Clone Your Repository
Before you can make any changes, you need a local copy of the project on your computer. This copy is called a “clone” of the repository.
Prepare Your Local Environment
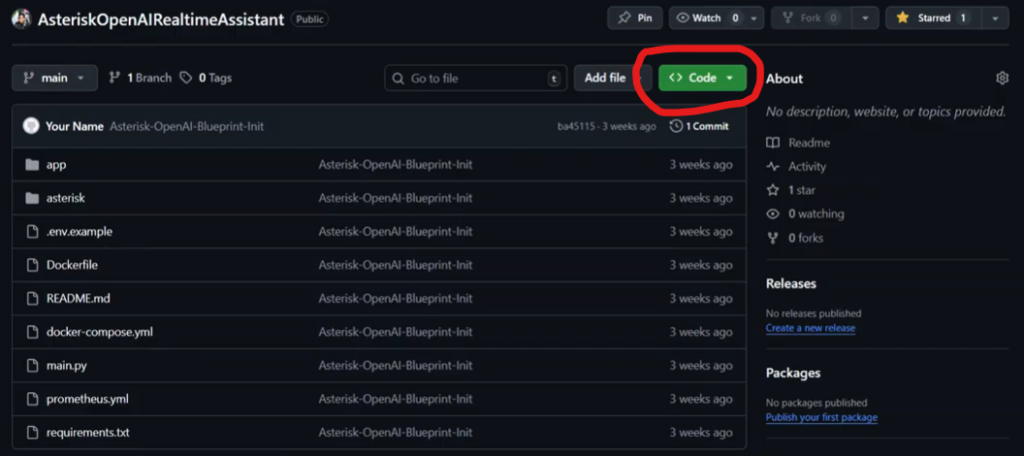
First, find the project you want to work on in GitHub. You will need its URL. Look for a “Code” button on the GitHub repository page and copy the URL. It usually starts with https://github.com/.
Next, choose a folder on your computer where you want to save the project. This could be your Desktop or any other folder you prefer. Open your computer’s command line interface (CLI) in that folder.
- On Windows: Go to your chosen folder in File Explorer. Type
cmdin the address bar at the top and press Enter. This will open a Command Prompt window directly in that folder. - On Mac OS or Linux: Open your Terminal application. Use the
cdcommand to navigate to your chosen folder. For example,cd Desktopwould take you to your Desktop folder.
Clone the Repository
Once your command line is open in the correct folder, you can clone the repository. Type the following command and press Enter:
git clone [repository URL]
Replace [repository URL] with the link you copied from GitHub. For example:
git clone https://github.com/your-username/your-project.git
After you run this command, Git will download a full copy of the project to your chosen folder. You will see a new folder appear with the project’s name.
Make Changes and Commit Them
Now that you have the project on your computer, you can make your planned changes.
Open the Project in VS Code
We will use Visual Studio Code (VS Code) to edit the project. In your command line, navigate into the new project folder using the cd command. For example, if your project folder is named my-project, type:
cd my-project
Once inside the project folder, type code . and press Enter. The period . tells VS Code to open the current folder. This command will launch Visual Studio Code with your project ready to go.
Add or Change Files
Inside VS Code, you can now add new files or change existing ones. For this example, let’s create a new file.
- In the VS Code Explorer, click the “New File” icon.
- Name the file
test.txt. - Add some text inside the file, like “This is a test.”
- Save the file (File > Save or Ctrl+S / Cmd+S).
Stage and Commit Your Changes
After making changes, you need to tell Git what you have done. This is a two-step process:
- Stage your changes: This adds the modified files to a staging area, telling Git which changes you want to include in your next commit. Type this command in the VS Code terminal (you can open it by going to Terminal > New Terminal):
git add .The.means you are staging all changes in the current directory. You can also stage specific files, likegit add test.txt. - Commit your changes: This saves your staged changes to your local Git history. Think of it as creating a snapshot of your project at this point. Type this command:
git commit -m "Add test file"The-mflag lets you add a short message describing your changes. Make your message clear and helpful. For our example, “Add test file” is a good commit message.
Create a New Branch
Before you push your changes to GitHub, it’s best practice to create a new branch.
Why Use a Branch?
Branches help keep the main project code clean and stable. When you work on a new feature or fix a bug, you do it on a separate branch. This means your work does not affect the main project until it is ready. If your changes cause problems, they are isolated to your branch.
Switch to a New Branch
To create a new branch and switch to it at the same time, use this command:
git checkout -b PR-test
git checkout -bcreates a new branch.PR-testis the name of your new branch. You can choose any name that describes your work.
If you had already created a branch and just wanted to switch to it, you would use git checkout branch-name. For this guide, PR-test is our new branch. Your committed changes (like adding test.txt) are now on this new branch.
Push Your Branch to GitHub
Now that your changes are committed to your new branch, it is time to send them to GitHub. This makes your branch visible online. Use the following command:
git push origin PR-test
git pushsends your local changes to the remote repository.originis the default name for the remote repository on GitHub.PR-testis the name of the branch you want to push.
Git will send your PR-test branch and its commits to GitHub. You might need to log in to your GitHub account if you have not done so recently.
Open Your Pull Request (PR)
After pushing your branch, you are ready to create the Pull Request on GitHub.
Find the Pull Request Option
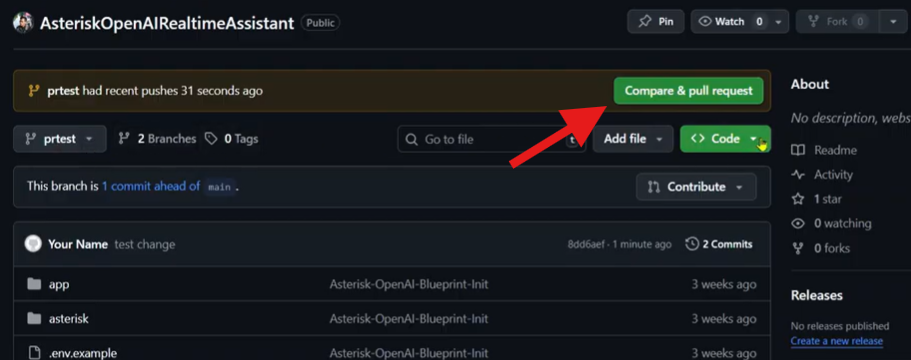
Go back to your web browser and open the GitHub repository page. You will likely see a message at the top of the page saying something like “PR-test had recent pushes.” It will offer a button to “Compare & pull request.” This is the easiest way to start your PR. Click it!
If you do not see this message:
- Switch to your new branch (e.g.,
PR-test) on GitHub using the branch dropdown menu. - Once on your branch, look for a “Contribute” button.
- Click “Contribute” and then “Open pull request.”
Both methods will take you to the same page to create your PR.
Fill Out Your Pull Request Details
On the Pull Request page, you will see that you are proposing to merge your PR-test branch into the main branch (or master branch, depending on the project).
- Title: Give your Pull Request a clear and brief title. For example, “Add test.txt file” or “Feature: User Profile Page.”
- Description: Write a detailed description of your changes. Explain why you made them and what problem they solve. This helps others understand your work.
After adding the title and description, click the green “Create pull request” button.
What Happens Next?
Once you create the Pull Request, it becomes visible to the project’s maintainers. These are the people who manage the main project code.
- Review: Maintainers can review your code. They might leave comments or ask questions.
- Changes: You might need to make more changes based on their feedback. You can push new commits to your branch, and they will automatically update the Pull Request.
- Merge: If everything looks good, a maintainer will merge your Pull Request. This means your changes will become part of the main project.
- Close: If your changes are no longer needed or do not fit the project, the maintainer might close the Pull Request without merging it.
As the person who created the PR, you will not see the “Merge pull request” button unless you are also a maintainer of the project. The maintainer will see all the details, including your changes, commits, and any discussions. They can then decide to merge your work into the main codebase.
Conclusion
Creating a Pull Request is a key skill for any developer working with Git and GitHub. It allows you to contribute to projects, collaborate with teams, and learn from others’ feedback in a structured way. By following these steps—cloning the repository, making changes on a new branch, pushing that branch, and opening a PR-you can successfully share your code with the world. Keep practicing, and you will soon be contributing like a pro!
Have you made your first open-source contribution? Share your experience below! We would love to hear about it.
If you found this guide helpful and want to support more content, you can buy me a coffee.